Revised 8-23-2014
From 1984:
Motorcyle touring, camping, and ham radio are activities I've immensely enjoyed. It only seemed natural to want to combine them. Unfortunately, most commercial ham radio equipment available in the early 1980's was rather large, particularly for packing on a motorcycle where space is at a premium. The equipment was also power-hungry, with typical receive current consumption of an amp or more. Battery operation for extended periods was not practical with such equipment. (Elecraft would not come into existence for another fourteen years.)
A review of my ham radio logbook revealed the majority of my operating activity over the previous few years was on the 20 meter band, and most of it was CW (Morse code.) The concept of a small, rugged, low-power (QRP) CW transceiver exclusively for the 20 meter band began to take shape. The following design goals were identified:
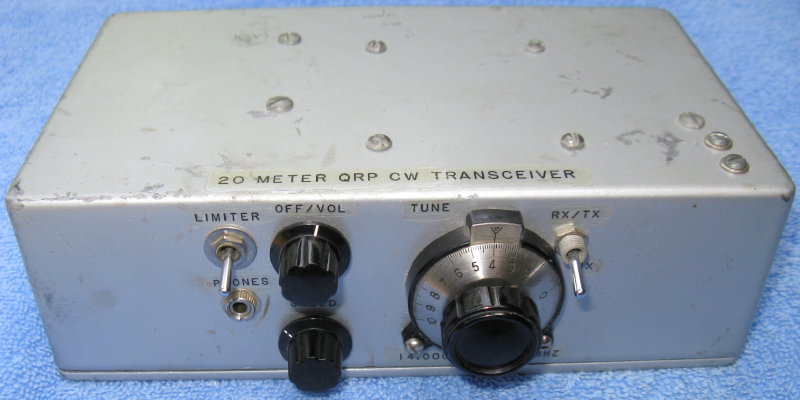
* Continuous tuning over the lower 100 kHz of the band using a VFO to set the desired operating frequency (not rock-bound with crystals.) Operating frequency displayed directly from a vernier dial.
* Transceive operation, not independent receiver and transmitter.
* Low power consumption intended for 12 volt battery operation.
* Rugged packaging and small size.
* Nominal five watt transmitter output power.
* Full break-in keying (QSK), such that received signals can be heard between transmitted dots and dashes.
* Solid state transmit-receive switching without relays.
* Built-in electronic keyer to automatically form dots and dashes.
* Sensitive superheterodyne receiver (not direct conversion) with six poles of IF crystal filtering, nominal 400 Hz bandwidth.
Full scale development of this transceiver commenced in the summer of 1984 in my spare time. By the year's end it was assembled and tested. All design goals were met.
1985 to early 1990's:
The little transceiver was an absolute joy to operate. It accompanied me on numerous motorcycle camping trips, including the 1990 trip to Alaska.
It was backpacked to the summit of Standing Indian Mountain in NC for one Field Day. It was backpacked to near the start of the Appalachian Trail in GA for multiple Field Days. It was also used extensively at home and performed very well in a number of stateside and DX contests. This was one fun radio!
But my work and other commitments reached a point where I had very little time for ham radio and I became inactive. I offered the rig to my friend Dennis, N4NR, for a long-term loan, which he accepted.
Early 1990's to 2014:
Dennis subsequently put the radio through its paces, even more than I had done.
He used it on numerous camping and business trips both in the continental US and in Hawaii, including from condos on Oahu and Kauai.
He operated Field Days with it. He used it mobile. He used it from his home as well.
Dennis is shown operating the transceiver from a black sand beach on Hawaii
on the cover of this ARRL publication.

Dennis still operates quite a bit, but only CW and mostly QRP with his Elecraft K1.
2014:
My ham radio activity had resumed in the previous decade.
Given the current popularity of QRP equipment and operation, it occurred to me that others may be interested in the radio and how it was designed back in the day. So I decided to post this writeup.
Dennis graciously returned the radio and expressed thanks for its loan. He had taken very good care of it.
The transceiver was powered up and thoroughly tested with no degradation of performance found. This was pretty remarkable for a thirty-year-old rig.
A photo shoot was then performed.
Finally, these refurbishment/upgrade actions were taken:
* All electrolytic capacitors were replaced. Tantalum replacements were used except for two 220 uF capacitors (due to cost reasons.)
* The BFO was recalibrated to precisely match the IF crystal filter response and to provide a 600 Hz pitch on receive.
* The vernier dial was replaced as the original was nearly worn out. The VFO was recalibrated.
* The monaural headphone jack was replaced with a stereo jack to allow the use of stereo headphones.
* The Cinch power connector was replaced with a PowerPole connector.
* The manual key jack was replaced with a stereo jack. The receive audio was coupled to the ring terminal of this jack. With this arrangement a computer interface could be connected to the radio via this connector.
* A filter was added to further reduce hiss generated in the LM386 audio output stage. Hiss was not a problem prior to the modification but this made the receiver even quieter.
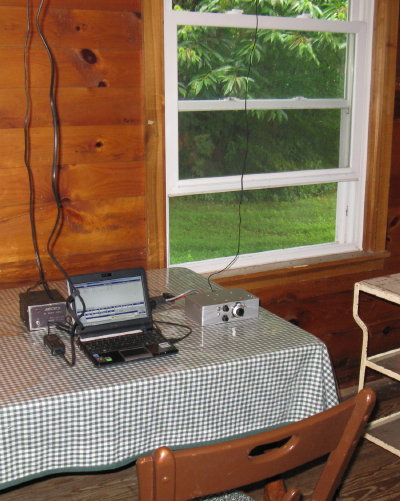
A number of contacts have been made post-refurbishment. The radio
accompanied me to the 2014 Amish Rally as
seen in this photo. For this particular trip the rig was keyed from a netbook
computer using this USB radio
interface.
I think the rig is now ready for another thirty years.
Schematic diagrams of the transceiver can be downloaded from the links below for both before and after refurbishment changes.
Schematic_May1987.pdf Before
refurbishment.
Schematic_Aug2014.pdf After refurbishment.
Additional project information can be found at these links: